Wall Avoidance
This guide will demonstrate how an autonomous agent can use wall avoidance to navigate through a world containing several buildings. The previous guide described how to use an XML file to hold the building vertex data and then load that into the sketch.
The starting point for this sketch was to use graph paper and
pencil (a pencil is mightier than the pen because it is easier to
make changes) to draw the layout of my buildings. Here is what it
looks like 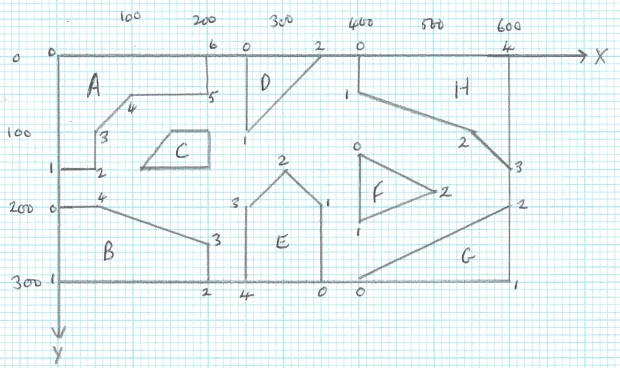
The world domain is going to be 600x300 world units and will use the WRAP constraint so an agent moving off one side will appear on the opposite side, hence the mirror symmetry of the borders. Since world units have one-to-one correspondence to the screen pixels the display size will also be 600x300.
I have labelled the buildings A, B, C ... and for each building I have numbered the vertices in a anti-clockwise order starting at zero. From this plan I then created the XML file shown here.
<?xml version="1.0" encoding="UTF-8"?>
<!-- building.xml -->
<buildings>

<building name="A">
	<pos x="0" y = "0" />
	<contour>
		<point x = "0"   y = "0" />
		<point x = "0"   y = "150" />
		<point x = "50" y = "150" />
		<point x = "50" y = "100" />
		<point x = "100" y = "50" />
		<point x = "200" y = "50" />
		<point x = "200"  y = "0" />
	</contour>
</building>

<building name="B">
	<pos x="0" y = "0" />
	<contour>
		<point x = "0"   y = "200" />
		<point x = "0"   y = "300" />
		<point x = "200" y = "300" />
		<point x = "200" y = "250" />
		<point x = "50" y = "200" />
	</contour>
</building>

<building name="C">
	<pos x="0" y = "0" />
	<contour>
		<point x = "150" y = "100" />
		<point x = "110" y = "150" />
		<point x = "200" y = "150" />
		<point x = "200" y = "100" />
	</contour>
</building>

<building name="D">
	<pos x="0" y = "0" />
	<contour>
		<point x = "250" y = "0" />
		<point x = "250" y = "100" />
		<point x = "350" y = "0" />
	</contour>
</building>

<building name="E">
	<pos x="0" y = "0" />
	<contour>
		<point x = "350" y = "300" />
		<point x = "350" y = "200" />
		<point x = "300" y = "150" />
		<point x = "250" y = "200" />
		<point x = "250" y = "300" />
	</contour>
</building>

<building name="F">
	<pos x="0" y = "0" />
	<contour>
		<point x = "400" y = "130" />
		<point x = "400" y = "220" />
		<point x = "500" y = "180" />
	</contour>
</building>

<building name="G">
	<pos x="0" y = "0" />
	<contour>
		<point x = "400" y = "300" />
		<point x = "600" y = "300" />
		<point x = "600" y = "200" />
	</contour>
</building>

<building name="H">
	<pos x="0" y = "0" />
	<contour>
		<point x = "400" y = "0" />
		<point x = "400" y = "50" />
		<point x = "550" y = "100" />
		<point x = "600" y = "150" />
		<point x = "600" y = "0" />
	</contour>
</building>

</buildings>
This approach greatly simplifies the task of locating data errors in the XML and make changes to the building layout if that should be needed.
All that remains is to create the sketch code that will use this file and that is shown here.
// WallAvoid_01
World world;
Domain wd;
Vector2D[] contour;
Building[] bs;
BuildingPic bpic;
Vehicle tourist;
PersonPic touristPic;
StopWatch sw = new StopWatch();

public void setup() {
  size(600, 300);
  world = new World(600, 300);
  wd = new Domain(0, 0, 600, 300);
  // Create the buildings
  bs = Building.makeFromXML(this, "building.xml");
  bpic = new BuildingPic(this, color(255, 255, 200), color(160, 160, 0), 2);
  for (int i = 0; i < bs.length; i++) {
    bs[i].renderer(bpic);
    world.add(bs[i]);
  }
  // Create the tourist
  tourist = new Vehicle(
      new Vector2D(300, 130),          // position
      10,                              // collision radius
     new Vector2D(15, 15),             // velocity
      40,                              // maximum speed
      new Vector2D(1, 1),              // heading
      1,                               // mass
      0.5,                             // turning rate
      800                              // max force
  );
  touristPic = new PersonPic(this, 10, color(160,160,255), color(160,144,70), color(0), 1);
  touristPic.addHints(Hints.HINT_WHISKERS);
  tourist.renderer(touristPic);
  tourist.worldDomain(wd, SBF.WRAP);
  tourist.AP().wanderOn().wallAvoidOn();
  tourist.AP().wallAvoidWeight(100).wallAvoidFactors(4, 16, 2.6, false);
  tourist.AP().wanderFactors(100, 30,10);
  world.add(tourist);
  sw.reset();
}

public void draw() {
  double elapsedTime = sw.getElapsedTime();
  world.update(elapsedTime);
  background(230);
  world.draw(elapsedTime);
}
In line 16 the XML file is read and an array of the 8 buidings is
created and stored in the bs variable. The next line
creates the renderer to be used to draw the buildings. Since all the
buildings are going to be the same colour then they can share a
single renderer. If the builings were to be different colours then
each one would need its own renderer. The next four lines set the
renderer for each building and adds the building to the world.
The tourist (our autonomous agent) is created in lines 23 to 32, then in lines 33 to 35 the renderer is created, wall avoidance hints are set and the added to the tourist.
In line 36 the agent is WRAP constrained to the world domain, [0,0]-[600,300] so the agent wraps to the opposite side when it moves outside of the domain.
The wander and wall avoidance behaviours are then switched on and their factors tweaked (using try and see what happens approach). Finally the tourist is added to the world and the game clock reset.
The completed sketch