Buildings
If you have looked at the Marketplace Patrol and the City Patrol sketches you will have seen many coloured 2D shapes which the autonomous agents move around, these are called buildings. Like a real building these buildings also have an inside and outside, agents can move from the inside to the outside but not the other way round.
 The shape
(contour) of the building is defined by an array of Vector2D
objects that define the building vertices, this is then passed to
the Building constructor.
The shape
(contour) of the building is defined by an array of Vector2D
objects that define the building vertices, this is then passed to
the Building constructor.
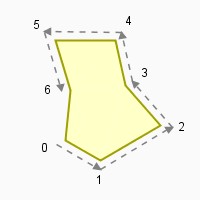
The order of the vertices in the contour array is important, start at any vertex and list them in anti-clockwise order. It is also important that none of the walls intersect, otherwise it will cause problems when rendering and cause inconsistent behaviour when using wall avoidance.
To create the building above the contour array would have 7 elements, one for each vertex and will be in the order shown (0 >> 6).
The code needed to create and display this building is
// Building_01.pde
World world;
Vector2D[] contour;
Building b;
BuildingPic bpic;

public void setup() {
  size(200, 200);
  world = new World(200, 200);
  contour = new Vector2D[] {
    new Vector2D(65, 140),
    new Vector2D(100, 160),
    new Vector2D(160, 125),
    new Vector2D(125, 85),
    new Vector2D(115, 40),
    new Vector2D(55, 40),
    new Vector2D(70, 90)
    };
  b = new Building(contour);
  bpic = new BuildingPic(this, color(255,255,200), color(160,160,0), 2);
  b.renderer(bpic);
  world.add(b);
}

public void draw() {
  background(230);
  world.draw(0);
}
The contour array is created in lines 10 to 18. Then it is used in line 19 when the building is created. To make it visible, a BuildingPic renderer is created and set in lines 20 and 21. Finally add the building to the world to manage and draw.
Creating buildings from an XML file
In the code above you can see that the biggest chunk of it was to create the contour array. As we add buildings the amount of code to create all the contours would soon be huge. Apart from being messy it would be difficult to locate any errors in specifying the coordinates. One solution is to create an XML file that describes the building and use the library to create the building from the file.
The XML file
<?xml version="1.0" encoding="UTF-8"?>
<!-- building.xml -->
<buildings>

<building name="Block 1">
	<pos x="0" y = "0" />
	<contour>
		<point x = "65"  y = "140" />
		<point x = "100" y = "160" />
		<point x = "160" y = "125" />
		<point x = "125" y = "85" />
		<point x = "115" y = "40" />
		<point x = "55"  y = "40" />
		<point x = "70"  y = "90" />
	</contour>
</building>

<!--
	You can add further buildings here
-->

</buildings>
The first line is required and simply defines the content as XML and the next line is simply a comment with the filename. All the buildings should be defined between the <buildings> </buildings> tags and each building should be defined between <building> </building> tags.
The name is optional but recommended. Line 6 defines an offset to be added to each pair of XY coordinates in the contour which is defined in lines 7 to 15.
Make sure this file is inside the sketch folder (I recommend that a folder called data is created inside the sketch folder and the XML file to be inside the data folder). To use this
To use this file the sketch code is changed to -
// Building_02.pde
World world;
Vector2D[] contour;
Building[] bs;
BuildingPic bpic;

public void setup() {
  size(200, 200);
  world = new World(200, 200);
  bs = Building.makeFromXML(this, "building.xml");
  bpic = new BuildingPic(this, color(255, 255, 200), color(160, 160, 0), 2);
  bs[0].renderer(bpic);
  world.add(bs[0]);
}

public void draw() {
  background(230);
  world.draw(0);
}
Line 10 causes the XML file to be read and return an array of the
building entities created. The
length
of the returned array represents the number of buildings created,
his maybe zero if it was unable to create any buildings.
The great advantage of using an XML file (apart from clearer code) is that it simplifies the task of debugging errors when specifying the contour coordinates, or when making simple changes to the design.
You can see this in action in the next guide.